Making your website WCAG compliant for accessibility

Does your website meet accessibility compliance guidelines? Websites are the gateway to businesses, information, and services. As we compete to create visually appealing and engaging online platforms, with the goal of wooing more visitors, one crucial aspect often gets overlooked: accessibility. Ensuring that your website is accessible to all, regardless of disability, is not only a moral obligation but also a government legislative requirement. Accessibility ensures that everyone, regardless of disability, has equal access to use your website.

When does my website need to be accessible by?

In Ontario, as of January 1, 2021, organizations with 50 or more employees are already required to have an accessible website. Ontario has a goal of being fully accessible in 2025, which likely means that if you have a website, and you live or your business operates in Ontario, you may be required to make your website WCAG 2.0 Level AA compliant under Accessibility for Ontarians Disabilities Act (AODA).

What is WCAG?

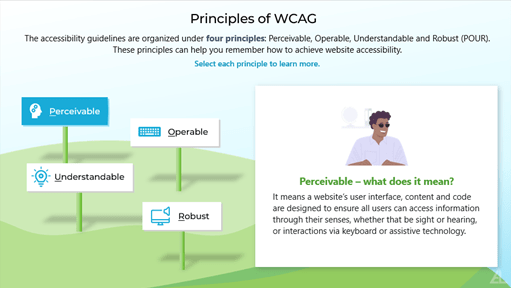
WCAG stands for Web Content Accessibility Guidelines and it is the international technical standards developed by the World Wide Web Consortium (W3C) that gives web developers guidelines on how to make web content accessible. These guidelines provide a framework for creating websites under the four principles of WCAG: perceivable, operable, understandable and robust (POUR). Each principle contains a set of success criteria, categorized by three levels (A, AA, AAA) which represent a standard of accessibility that improves access for users with disabilities. To be compliant in Ontario, websites and web-based apps must meet the four principles (POUR) of WCAG and have a mid-range (A and AA) to be compliant.

""

Why is having an accessible website important? The benefits!

According to Statistics Canada Canadian Survey on Disabilities (CDS) 2022, 8 million Canadians, 15 years and older have a disability. These disabilities range in severity from mild, moderate, severe to very severe. Some people have one type of disability, but many persons with disabilities can have two or more types.

Having an accessible website enables you to increase profitability by reaching broader, and potentially untapped markets. Since everyone can access your website to purchase your goods and services it opens the door to new customers.

An accessible website reflects your adaptability, commitment, values and dedication as an organization to creating and inclusive digital space. They also have better user-ability and website performance in general which leads to an increased customer satisfaction, enhanced brand recognition and reputation, and positive word-of-mouth referrals.

An accessible website also makes you compliant with Canada’s and Ontario’s accessibility laws. Non-compliance may result in fines or put you at risk for being liable.

""

What are website barriers?

Imagine trying to navigate the web without the ability to see, hear or interact using a mouse. For millions of Canadians this is a reality. An accessible website breaks down barriers, providing equal access and opportunities, regardless of ability, to navigate, understand, and engage with your website content while maintaining a great user experience.

Cognitive barriers include:

  • Confusing design layouts and navigation structure.
  • Forms and fields are not intuitive and doesn’t have clear instructions or labeling.
  • Media auto-plays without user interaction, which can be startling and disorienting.

Dexterity barriers include:

  • Navigation requires a mouse.
  • Buttons, menus or checkboxes are small, too close together or difficult to select.

Seeing barriers include:

  • Screens are mouse-driven and require sight to make selections.
  • Videos, audio, images and diagrams are missing text alternatives.
  • Fonts are small or elaborate.
  • Colour combinations have poor contrast. Text is hard to read.
  • Auto-playing media overlaps with a screen reader or other assistive devices.
  • Downloadable documents are not set up for reading in correct sequence.

Hearing barriers include:

  • Video, audio and other media doesn’t have text descriptions or closed captioning.
""

How do I make my website accessible?

Navigating the complexities of the WCAG guidelines, principles with the mid-range of conformity and understanding all the legislation can be confusing and daunting. Empower Learning Solutions has an online learning course called “Accessible Websites” that can help explain the requirements. The Accessible Websites course is available in the Premium Access subscription.

We’ve taken the WCAG guidelines and created a course that is in simple English so that you understand ‘what’ is required and ‘how’ to achieve that requirement. We start by defining what each of the POUR principles mean.

Four principles of WCAG include Perceivable, Operable, Understandable, Robust

Then we give break down each principle into the specific guidelines and actions you need to take with examples of what you need to do to meet an A and AA level.

Text alternatives for images include learning what is alt text, when is it needed, how do you write an alt text.

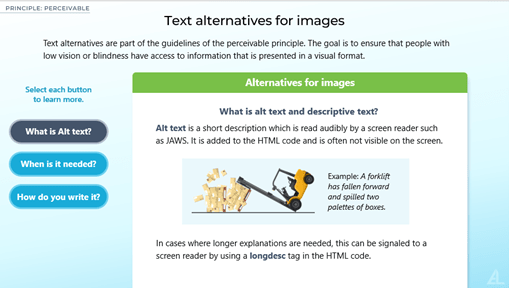
In this example of Text alternatives for images, you will need to:

  • Provide text alternatives for non-text content
  • Make your website keyboard accessible
  • Ensure your website is compatible with assistive devices like screen magnifiers and JAWs reader
  • Have the right colour contrast, using a colour contrast checker
  • Use the correct HMTL coding to identify headers
  • Tab order should navigate content in a logical order
  • Have visible indicator so users know which item on the page has keyboard focus
  • And more

Who should take the Accessible Websites course?

We recommend several people take the course. As an owner of the business, you need to be aware of the website requirements therefore it is important you understand what is required of you and ensuring your website achieves compliance. At the end of the day, it is you who will have to pay any fines for deficiencies or address any liability claims.

The person responsible for updating your website (e.g. web developer and/or website administrator). Rather than relying on you to explain what is needed, save time and energy and have them take the Accessible Website course too. With your library subscription, you have unlimited access to the online training course so there is no additional cost.

The Accessible Websites course helps to make you an industry leader to stay ahead and respond to market shifts and trends. Turn your website into a competitive edge and ensure you are compliant to meet legislative accessibility requirements.

""

Remove users or groups leaders from my group

To remove users from your group, follow these instructions:

Under the Enrolled users section, locate the user(s) you want to remove from the list.

Select the checkbox next to each user’s name. A Remove user(s) button will appear above the list.

Select Remove user(s) and follow the prompts.

To remove group leaders from your group follow these instructions:

Under the Group leaders section, locate the user(s) you want to remove from the list.

Select the checkbox next to each user’s name. A Remove group leader(s) button will appear above the list.

Select Remove group leader(s) and follow the prompts.

Tracking Employees Training Progress Reports (incredibly detailed reports)

To view every nitty gritty detail kind of reports follow these instructions:

Select the Incredibly Detailed Report link in the welcome message or use this link here.

More instructions are available on that page.

Tracking Employees Training Progress Reports (simple reports)

To view simple, at a glance, reports, follow these instructions:

Under the Enrolled Users section, select the Reports drop-down menu button.

Select Course or Progress from the list.

What’s the difference?

Course: Search by a specific course to see who has completed that course.

Progress: Search by a specific employee to see which courses they have already completed.

Follow the on-screen instructions based on the report you select.

Add a group leader (administrator) to your group

Under the Group leaders section, select the Add group leader button.

Complete the mandatory fields in the pop up and select the Add group leader button.

Existing users can become Group Leaders – When adding a group leader use their existing email address and they will be upgraded.

Additional group leaders can add and remove users and access your team’s online course completion reports. They will not have the ability to change your subscription or billing information.

Invite multiple employees at a time (using our downloadable template) to start their training

You can use this method to add up to the remaining seats in your account. This is a advanced method for group leaders who are comfortable editing .csv files. We strongly recommend you read the full instructions before attempting this method.

Download the sample .csv file

In a text editor or a program like MSExcel:

Open the same file on your computer.

Complete the .csv file with the first and last names and email addresses of everyone you want to invite. Enter a temporary password or leave blank if you want us to generate one for you.
When done, save your .csv file.

IMPORTANT: When saving in MSExcel, a warning may appear—Some features in your workbook might be lost if you save it as a CSV (Comma delimited) file. Do you want to keep using this format? YES, you want to keep this format! Make sure you save your file as a .csv NOT .xlsx.

Return to the pop up window, select your saved .csv file and select Choose File.

In the pop up window, select either Add and invite user or Send enrollment key.

If you select Send enrollment key, you can also select Suppress emails. You can give the enrollment key to the employee offline. The employee can use a different email address with that access key. It will update in your dashboard. Otherwise, all instructions and links are included in the employee’s invitation email.

Select the Add users button.

You can review the upload and click Done to return to your dashboard.

You will see the users added and their corresponding enrollment keys.

If any users were added in error, you can select the checkbox next to their name and select the Remove button.

What’s the difference?

Add and invite user: Sends the employee an email with a password that you’ve chosen or a random one we’ve generated (if you leave the password field blank). They take up a seat in your group, and their status is set to Not Started.

Send enrollment key: Sends a special code for the employee to self-register on our website. They take up a seat in your group, and their status is set to Not Enrolled.

Invite multiple employees (up to 25 at a time) to start their training

Under the Enrolled users section, select the Users drop down menu button.

Select Add multiple from the list.

In the form that appears on the page, complete the first and last names and email addresses of everyone you want to invite.

Enter a temporary password or leave blank if you want us to generate one for you.

When you are done entering, scroll to the bottom of the list and select the Add & invite users button.

All instructions and links are included in the employee’s invitation email.

Get a FREE Workplace Harassment and Violence Policy Template

Did you know? Business owners in Canada are legally required required to have a Workplace Harassment and Violence Policy.

We make it easy! Download a FREE template to create your Workplace Harassment and Violence Policy today!

Invite one (1) employee to start their training

Under the Enrolled users section, select the Users drop down menu button.

Select Add one from the list.

In the pop up window, select either Add and invite user or Send enrollment key.

Complete the mandatory fields in the pop up and select the Add user button.

All instructions and links are included in the employee’s invitation email.

What’s the difference?

Add and invite user: Sends the employee an email with a password that you’ve chosen or a random one we’ve generated (if you leave the password field blank). They take up a seat in your group, and their status is set to Not Started.

Send enrollment key: Sends a special code for the employee to self-register on our website. They take up a seat in your group, and their status is set to Not Enrolled.

Website Compliance Courses